
Tip 1. It’s all in your perspective.
Perspective is key to excellent flower photography. This is something my aunt Kathey taught me. She said not to photograph everything at eye level. When you do that, you limit the view your audience gets from your photos. Change things up and shoot at different angles. Lay on the ground and get close to the flower or flowers you’re trying to photograph. You can try shooting very far away with a telephoto lens and get some fantastic images.
The main objective in any photo is to amaze your audience with your images because you’re not trying just to take a snapshot, you’re trying to create a work of art. Know body wants to settle for another dull image rather your a novice just learning or a professional trying to grow their portfolio into something special so their clients will keep coming back for more. So make sure you change up your perspective.
One thing to keep in mind is if you lay down to photograph flowers. Is to make sure to check out what you’re laying down on. I was photographing flowers with my aunt Kathey. After we were done, the sun had already gone down. We hiked back to our campsite and had dinner. Got to bed early because we wanted to hike out to a new spot before sunrise.
About an hour later, I felt this incredible burning pain in my manhood yea you read that right! A tick had crawled inside my pee hole. My aunt woke up and said, what’s wrong? She turned on her flashlight, and there I was with my manhood IN MY HAND!
She yells, what the hell are you doing? I said there’s something inside me! Thank god she was a nurse. She says, let me look at it. Reluctantly I let her look. She says my god it’s a tick, and it’s attached! I said no shit it hurts what do I do? She says hold on and gets her backpack out, and she pulls out a box of matches and a tweezer.
I said, what the hell are you going to do with matches. She says I will light the match and touch the tick so it will back out of your penis so I can grab it with my tweezers! I said, hell no, you’re not going to do that!! So I got the tweezers and grabbed the tick and pulled it out the next day my manhood swelled up to the size of a lemon! It hurt for weeks! Moral of the story: make sure you know what you’re lying on and check for ticks after you’re done!!
Tip 2. It’s all about the light.
The key to photography it’s all about light. Head out in the morning before sunrise or in the evening shortly before sunset. In most cases, the best light will be in the morning right before sunrise and before the sun starts to set. There will be days before and after a storm. Whether it’s earlier in the day, middle of the day, or in the evening. Stormy weather is a good time to photograph flowers. The more you go out and photograph, the more you will see what I call the right light. One situation would be backlighting the flowers when you’re photographing them. That would be having the sun behind the flower or flowers.
Tip 3. To photograph one flower or more?
This is one of the lessons that my aunt Kathey had a hard time getting into my head: you don’t have to shoot flowers like a landscape. One day she took out two lenses, a telephoto lens, and a macro lens. That opened up my mind to see flower photography in a whole new way. It was awesome to get close with a macro lens because you can see so much detail in the flower when you use a macro lens.
So take a variety of lenses to photograph and experiment to see what lenses you enjoy most. You don’t have to use all of them. Macro photography can be very technical. I found that I had to have a lot of patience when using that lens. I would look back at the images later, and a lot of them were horrible. My aunt suggested using a cable release with the macro lens because any camera shake would ruin the photos I took. After that boy, I was a happy camper. So try a variety of lenses to see what you enjoy using.
Tip 4. Show movement with your flower photography.
I always used to think that the best images were ones that were tacked sharp. I was out with a fellow photographer Steven Hunter, I was looking at some of his pictures on his viewfinder and was blown away by what I saw. They were beautiful; here is a link to one of my favorite flower images that show movement. Don’t just focus on tacked sharp images, be an artist, be creative, you will find you can create amazing images by showing movement.

Tip 5. Look at your background and your foreground.
This was a great tip that my fellow photographer Steven Hunter taught me. We were at the Presson Oglesby Prairie in Arkansas. I saw him picking up twigs that were on the ground by the flower he was photographing. I asked him why he did that?
He said that having a background or a foreground with a distraction will take the viewer away from what you’re trying to show them. Which is the beauty of the flower itself? Make sure you’re looking through your viewfinder or your LCD screen to make sure you don’t have any distractions in your image.
Tip 6. Location Location Location.
I used to believe I had to go to a special place to photograph flowers. I discovered that my own back yard had some fantastic flowers to photograph. I was also living in the country in Arkansas in a wooded area, so that did help. Check out you’re yard, and if you don’t have that option, look to see if you have a botanical garden in your city or neighborhood.
I lived in Memphis, Tennessee, for a while, and they have a beautiful Botanical garden called Memphis botanic garden. It’s a fantastic place to photograph flowers and insects and learn about what you’re photographing.
Tip 7. Go out on an overcast day.
When I first started to photograph flowers, I would go out on sunny days. My images were always really harsh looking. I would have to do a lot of editing in photoshop. One day my aunt Kathey suggested going out on an overcast day and what a difference it made.
The light was even in the entire image and help the colors to pop. I discovered that it softens the light, and the flowers had no shadows or harsh bright spots. Which helps to get a properly exposed image. Check your weather forecast, and if you have rain coming, definitely go out and get some great pictures before and after a storm is a great time to go out.
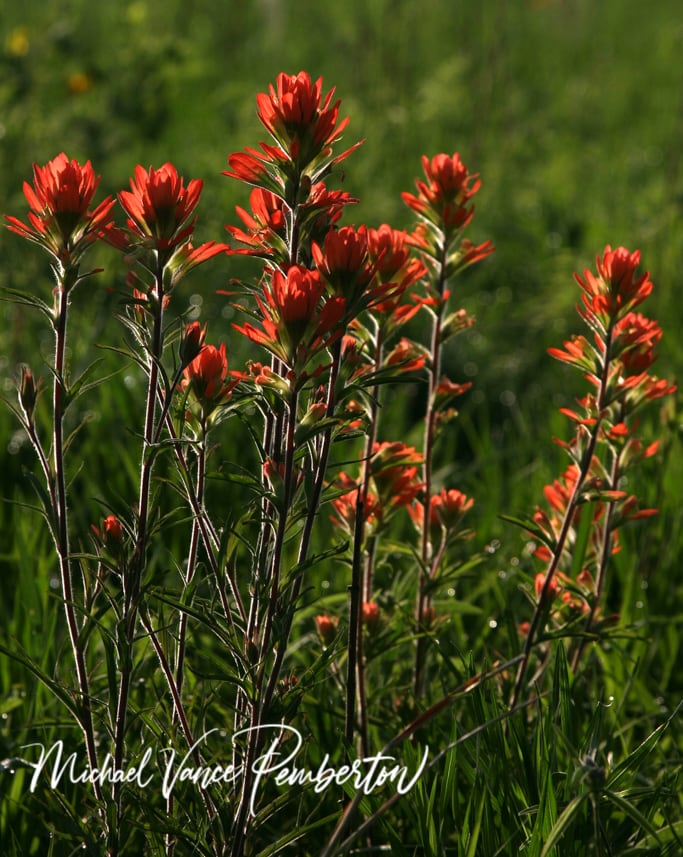
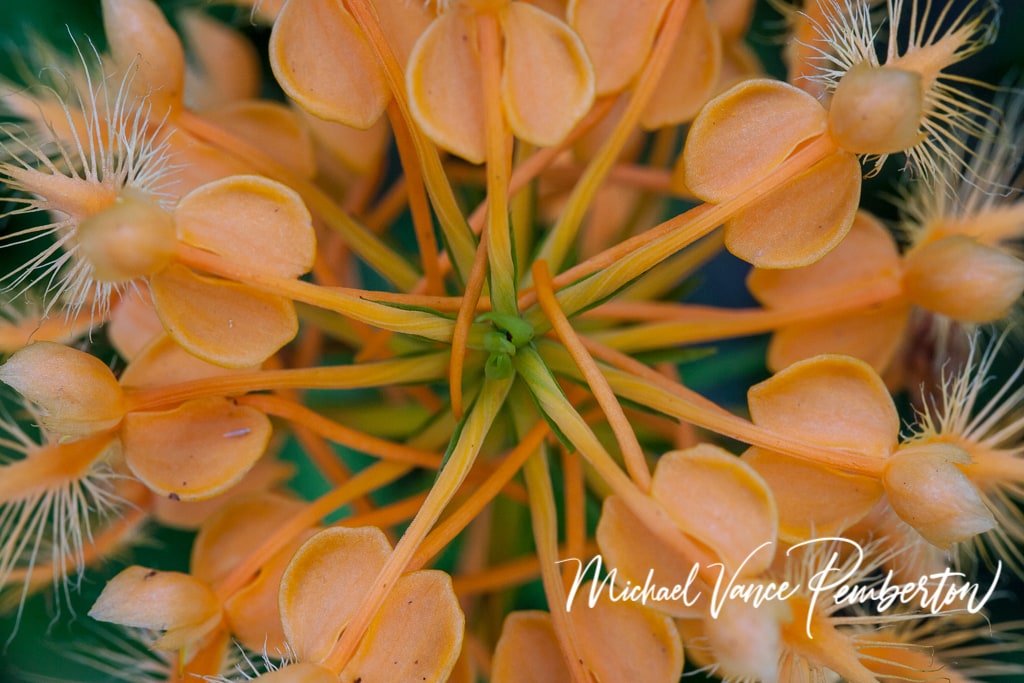
Tip 8. Make your flower images glow with backlight.
I have already discussed how important light is. But I want to pass on this specific tip about backlighting. The backlight is when your source of light is directly behind your flowers.
When you use this technique, your flowers will have a translucent look that will make your flowers appear to glow. The image above of the Indian Paint Brush is an example I used the technique of backlighting. Use this technique, you need to go early in the morning or late in the evening when the sun is close to the horizon.
Tip 9. Shallow Depth Of Field.
What do I mean by shallow depth of field? It’s when only part of your image is sharp, and the rest has a soft look to it. You will achieve this technique by using a wide aperture. So chose a low aperture number such as f/4 or f2.8. If possible, use a telephoto lens because you can really see the effect when using a telephoto lens.
Tip 10. Practice Practice Practice.
This is something all of us need as photographers if you want to become a great photographer. I am still trying to achieve that status.
Conclusion: I hope that these 10 tips will help you perfect your flower photography and create some fantastic images. Good luck PS: PRACTICE PRACTICE.


Recent Posts
Twenty Years in the Wild: The Patience Behind Capturing the Swallow Migration.
The Colorado River near Castle Dome glowed with first light, the water turning from ink to molten copper as the desert woke. Out of the riparian thickets rose a living wave of thousands of Tree...
Hey there, fellow shadow chaser. If you’re reading this, you’ve probably stood in golden hour light, watched a bird, a car, or a lone tree melt into a perfect black shape against a blazing sky,...