
Low-light photography is a captivating realm of the photographic world that presents unique challenges and opportunities. Whether you’re capturing the ambiance of a dimly lit cafe, the stars in the night sky, or the magical moments of a candlelit event, mastering low-light photography can take your skills to a whole new level. This article will explore essential techniques and tips to help you achieve better low-light photography results.

Choose the Right Gear:
To excel in low-light photography, having the appropriate equipment is essential. Here are some gear considerations:
- A Fast Lens: Invest in a lens with a wide maximum aperture (e.g., f/1.4 or f/2.8). A fast lens allows more light to reach the camera sensor, enabling better performance in low-light conditions.
- A Sturdy Tripod: A tripod is invaluable for long-exposure low-light shots. It stabilizes your camera, preventing camera shake and ensuring sharp images.
- A Camera with Good Low-Light Performance: Some cameras handle low-light situations better than others. Cameras with larger sensors tend to perform better in low light due to their improved sensitivity.
Use a Wide Aperture:
Adjusting your lens to its widest aperture (indicated by the smallest f-number) is a crucial technique in low-light photography. This simple adjustment significantly impacts the amount of light that enters your camera and the creative possibilities it offers. Let’s explore this concept further:
Maximum Light Inflow:
When you set your lens to its widest aperture, you open the aperture diaphragm to its fullest extent, allowing the maximum amount of light to enter your camera. In low-light situations, where light is scarce, this is essential for achieving proper exposure without excessively long shutter speeds or high ISO settings.
Brightening the Image:
The wider the aperture, the more light the lens can gather in a given amount of time. This results in a brighter image on your camera’s sensor, making capturing details in low-light conditions easier. This can be particularly useful when shooting in dimly lit environments such as night scenes, indoor events, or during twilight.
Shallow Depth of Field:
One of the artistic benefits of using a wide aperture is the creation of a shallow depth of field. This means that only a tiny portion of your image, typically the subject you focus on, will be in sharp focus, while the background and foreground blur into a pleasing, creamy background known as bokeh.
Subject Isolation:
The shallow depth of field achieved with a wide aperture allows you to isolate your subject from its surroundings. This is particularly effective in portrait photography, where a blurred background can draw attention to the subject’s face, eyes, or other significant details. It helps eliminate distracting elements and highlights the main subject.
Creative Expression:
Wide apertures offer photographers an array of creative possibilities. You can use this technique to emphasize a specific subject within a scene, whether a person, a flower, or an object. The contrast between the sharp subject and the blurry background can add depth and visual interest to your images.
Low-Light Challenges:
While a wide aperture is excellent for low-light conditions, it does come with challenges. The narrow depth of field it creates means that you need to be precise with your focus, as even a slight error can result in a misfocused subject. Additionally, your composition may require careful consideration to ensure that the blurred background complements your image’s overall storytelling.
Lens Considerations:
Keep in mind that not all lenses are created equal regarding wide apertures. Some prime lenses are designed with exceptionally wide maximum apertures (e.g., f/1.4, f/1.2), while zoom lenses may have variable apertures that become narrower as you zoom in. The choice of lens depends on your photography style and needs.
Using the widest aperture available on your lens is a fundamental technique in low-light photography. It allows more light into your camera, brightening your images in challenging lighting conditions. Furthermore, the creative potential of a wide aperture, such as subject isolation and beautiful background blur, can add depth and visual appeal to your low-light photos, enhancing their overall impact.
Optimize ISO Settings:
ISO sensitivity is a critical aspect of low-light photography, as it directly influences how your camera responds to available light. By understanding the relationship between ISO and image quality and experimenting with different ISO settings, you can strike the right balance to achieve optimal results in challenging lighting conditions. Here’s an in-depth exploration of this essential aspect of low-light photography:
Understanding ISO Sensitivity:
- Light Sensitivity: ISO stands for International Organization for Standardization, and in photography, it refers to the camera sensor’s sensitivity to light. A lower ISO setting (e.g., ISO 100) makes the sensor less sensitive, while a higher setting (e.g., ISO 1600, 3200) increases sensitivity, allowing for better performance in low-light situations.
- Digital Noise:
- The trade-off for increased sensitivity is digital noise, which appears as grainy or speckled patterns in your photos. This noise can degrade image quality, reducing sharpness and color accuracy.
- Noise is most noticeable in areas of the image with less light, such as shadowy regions or underexposed parts of the photo.
Finding the Right Balance:
- Experimentation:
- Achieving the right balance between ISO and image quality often requires experimentation. Select a moderate ISO setting (e.g., ISO 400) and take test shots.
- Review the test shots on your camera’s LCD screen or a computer to assess image quality, noise levels, and overall exposure. As you gain experience, you’ll understand when to adjust ISO.
- Modern Camera Advancements:
- Modern digital cameras, especially those with larger sensors, are better equipped to handle higher ISO values with minimal noise than older models. Don’t hesitate to push your camera’s ISO setting when necessary to capture the shot, as you may be pleasantly surprised by the results.
- Image Stabilization and Fast Lenses:
- Combining a camera with in-body or lens-based image stabilization and fast lenses with wide apertures (e.g., f/1.4, f/2.8) allows you to keep the ISO lower in low-light situations. Image stabilization helps reduce the need for high ISO settings by stabilizing the camera during handheld shots.
Low-Light Photography Scenarios:
- Indoor Events: When shooting indoor events or dimly lit venues, you may need to increase ISO to freeze action or capture candid moments without a flash.
- Night Photography: For night photography, astrophotography, or capturing cityscapes in low light, higher ISO values are often necessary to maintain reasonable shutter speeds and capture the desired details.
- Available Light: In situations where you want to preserve the ambiance of available light, such as candlelit dinners or twilight landscapes, balancing ISO with slower shutter speeds can help maintain image quality while conveying the mood.
Post-Processing Noise Reduction:
- Software Tools: Many photo editing software programs offer noise reduction tools that can help mitigate digital noise in post-processing. These tools allow you to selectively reduce noise while preserving important details.
ISO sensitivity plays a pivotal role in low-light photography. While increasing ISO can make your camera more light-sensitive, striking the right balance is essential to maintain image quality. Experiment with different ISO settings, taking advantage of your camera’s capabilities, and use noise reduction techniques in post-processing when needed. With practice and a good understanding of your camera’s ISO performance, you can confidently tackle low-light scenarios and capture striking, noise-free images.
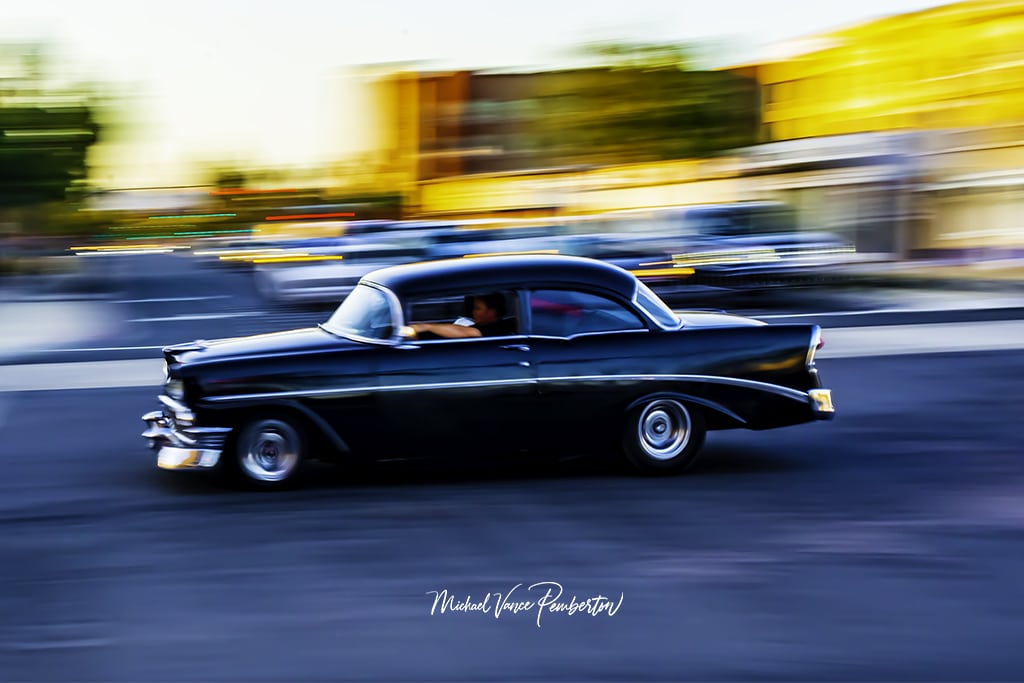
Slow Down Your Shutter Speed:
Understanding Shutter Speed:
Before we delve into the advantages of slowing down your shutter speed, it’s crucial to understand what shutter speed is and how it works:
- Shutter speed refers to the duration of time that the camera’s sensor or film is exposed to light when taking a photograph. It is typically measured in seconds or fractions of a second, such as 1/1000, 1/500, 1/250, 1/60, and so on.
- Faster shutter speeds (e.g., 1/1000) allow less light to enter the camera and are excellent for freezing fast-moving subjects like sports or wildlife.
- Slower shutter speeds (e.g., 1/30, 1″, or longer) keep the shutter open for a more extended period, permitting more light to reach the sensor. This is the key to capturing stunning low-light images.
Advantages of Slowing Down Shutter Speed:
- Increased Light: The primary benefit of slowing down your shutter speed is the increased amount of light that enters the camera. This can be a game-changer in low-light conditions, allowing you to capture properly exposed images without using high ISO settings.
- Long Exposures: Slower shutter speeds enable you to explore the realm of long exposures, which can yield stunning results. Long-exposure photography can capture smooth waterfalls, star trails, light trails from moving vehicles, and dreamy nightscapes.
- Creative Motion Blur: When you deliberately use slow shutter speeds to capture motion, you can create captivating motion blur effects. This technique is often employed in artistic and experimental photography to convey a sense of movement, energy, or time passing.
- Silky and Smooth: Slower shutter speeds can render scenes with flowing water or moving clouds silky and smooth, adding a serene and tranquil quality to your images.
Practical Tips for Slowing Down Shutter Speed:
- Use a Tripod: To avoid camera shake when using slow shutter speeds, it’s essential to stabilize your camera. A sturdy tripod is the most reliable tool for this purpose. Invest in a quality tripod to ensure sharp, long-exposure shots.
- Remote Shutter Release: For ultimate stability, consider using a remote shutter release or a cable release to trigger the shutter. This prevents any camera movement that can occur when pressing the shutter button manually.
- Mirror Lock-Up: If your camera offers the option, engage the mirror lock-up function. This prevents vibrations caused by the camera’s mirror flipping up before the exposure.
- ND Filters: In situations with too much light to achieve a slow shutter speed without overexposing the image, use neutral density (ND) filters. These filters reduce the light entering the lens, allowing you to use slower shutter speeds even in bright conditions.
- Manual Mode: To fully control your shutter speed, use your camera’s manual mode (M). This mode allows you to select the shutter speed and aperture settings to achieve your desired exposure.
- Experiment and Practice: Experiment with different shutter speeds to discover the creative possibilities. For example, try using a slower shutter speed to capture light trails from passing cars or a faster speed to freeze specific elements of a scene while allowing others to blur.
Slowing down your shutter speed is a versatile and powerful technique in photography, especially in low-light situations. It opens up a world of creative opportunities, from capturing dreamy landscapes to conveying the energy of motion. By mastering slow shutter speeds and employing the right equipment and techniques, you can elevate your photography and capture stunning images that captivate viewers and convey your artistic vision. So, embrace the magic of slow shutter speeds and unlock the full potential of your camera.
Use Image Stabilization:
Image stabilization (IS) and vibration reduction (VR) technology are invaluable features in many modern lenses and cameras. These technologies are designed to counteract the effects of camera shake, allowing photographers to capture sharp images even when using slower shutter speeds or shooting handheld in less-than-ideal conditions. Let’s explore this technology in more detail:
Understanding Image Stabilization (IS) and Vibration Reduction (VR):
- Camera Shake:
- Camera shake occurs when the camera moves slightly during the exposure, resulting in blurred images. This movement can be caused by factors such as hand tremors, breathing, or simply the act of pressing the shutter button.
- Camera shake becomes particularly noticeable when using slow shutter speeds, telephoto lenses, or shooting in low-light conditions.
- How IS and VR Work:
- Image stabilization and vibration reduction technologies utilize internal mechanisms within the lens or camera body to compensate for these small movements.
- These systems typically employ gyroscopic sensors that detect the camera’s movement and make rapid adjustments to counteract it. This results in a more stable image projected onto the camera sensor or film.
Benefits of IS and VR Technology:
- Slower Shutter Speeds: One of the primary advantages of IS and VR technology is their ability to allow photographers to use slower shutter speeds while maintaining sharpness. This is particularly beneficial in low-light situations where faster shutter speeds may result in underexposed images.
- Handheld Shooting: IS and VR technology enable photographers to shoot handheld in situations where tripods or other stabilization methods may not be practical. This flexibility benefits street photography, travel photography, or situations where mobility is essential.
- Telephoto Lenses: Telephoto lenses magnify camera shake’s effects due to their longer focal lengths. IS and VR are especially valuable when using telephoto lenses, as they help capture sharp, detailed images even at extended focal lengths.
- Reduced Fatigue: IS and VR technology can reduce photographer fatigue during extended shooting sessions. With stabilization systems, you can shoot comfortably without the constant concern of holding the camera perfectly steady.
- Video Shooting: IS and VR are equally essential for video recording, where smooth, stable footage is critical. They help eliminate the appearance of shaky or jittery videos, resulting in more professional-looking clips.
Types of IS and VR:
- In-Lens Stabilization: Some camera systems incorporate image stabilization directly into the lens. These lenses are often labeled with designations such as IS, VR, or OS (Optical Stabilization). This approach offers stabilization specific to the lens being used.
- In-Body Stabilization: In-body image stabilization is integrated into the camera body itself. This allows any lens attached to the camera to benefit from stabilization, regardless of whether the lens has its own stabilization system. In-body IS is a feature found in many mirrorless cameras and some DSLRs.
Image stabilization (IS) and vibration reduction (VR) technologies have revolutionized photography by enabling photographers to capture sharp images under challenging conditions. Whether you’re shooting handheld in low light, using telephoto lenses, or recording stable videos, IS and VR technologies are powerful tools that enhance the versatility and quality of your photography. When choosing a camera system or lens, considering the presence of IS or VR can significantly impact your ability to capture sharp, clear images in various shooting scenarios.
Conclusion:
Low-light photography is a rewarding challenge that can yield stunning and evocative images. By choosing the right gear, understanding the fundamentals of exposure, and employing creative techniques, you can capture the magic of low-light scenes with confidence and finesse. Remember that practice is key to mastering this genre of photography, so don’t be discouraged by initial setbacks. Embrace the learning process, and with time and experience, your low-light photography skills will shine brightly.


Recent Posts
Twenty Years in the Wild: The Patience Behind Capturing the Swallow Migration.
The Colorado River near Castle Dome glowed with first light, the water turning from ink to molten copper as the desert woke. Out of the riparian thickets rose a living wave of thousands of Tree...
Hey there, fellow shadow chaser. If you’re reading this, you’ve probably stood in golden hour light, watched a bird, a car, or a lone tree melt into a perfect black shape against a blazing sky,...