
Macro photography is a genuinely enchanting genre that opens up a gateway to the unseen wonders of our world. It allows us to delve into the realm of intricate details and reveal the beauty within the tiniest subjects. Through the lens of macro photography, everyday objects, and living organisms are transformed into captivating landscapes, exposing a whole new universe that often escapes the naked eye.
Whether you are an amateur enthusiast or a seasoned professional, mastering macro photography techniques can elevate your skills to new heights. It offers a unique opportunity to capture stunning close-up images that captivate viewers and convey the sheer magnificence of the microcosms surrounding us.
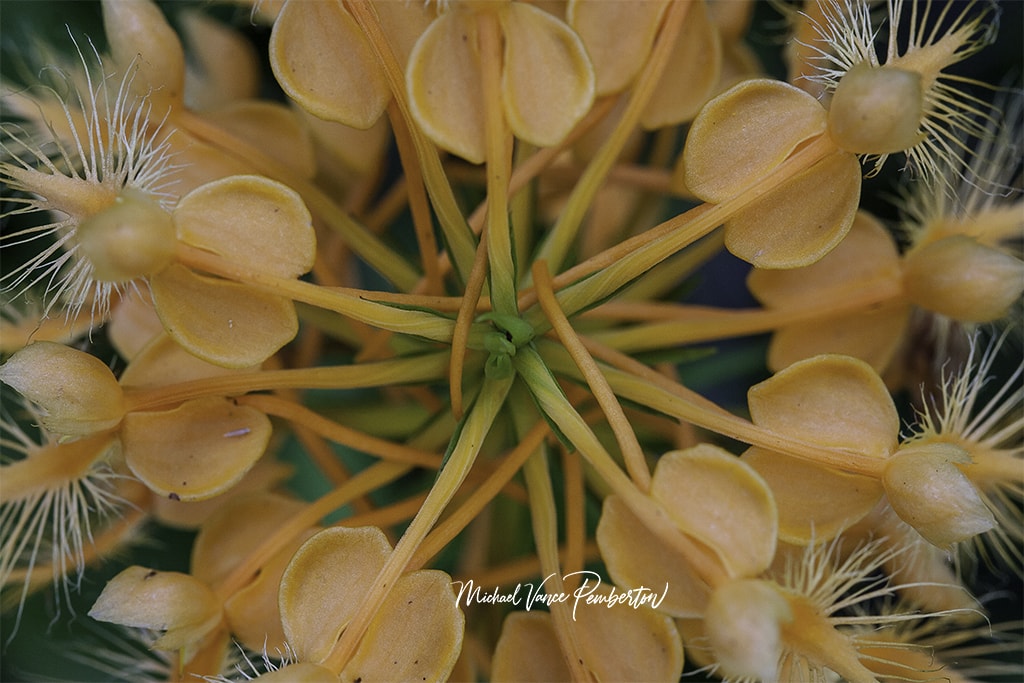
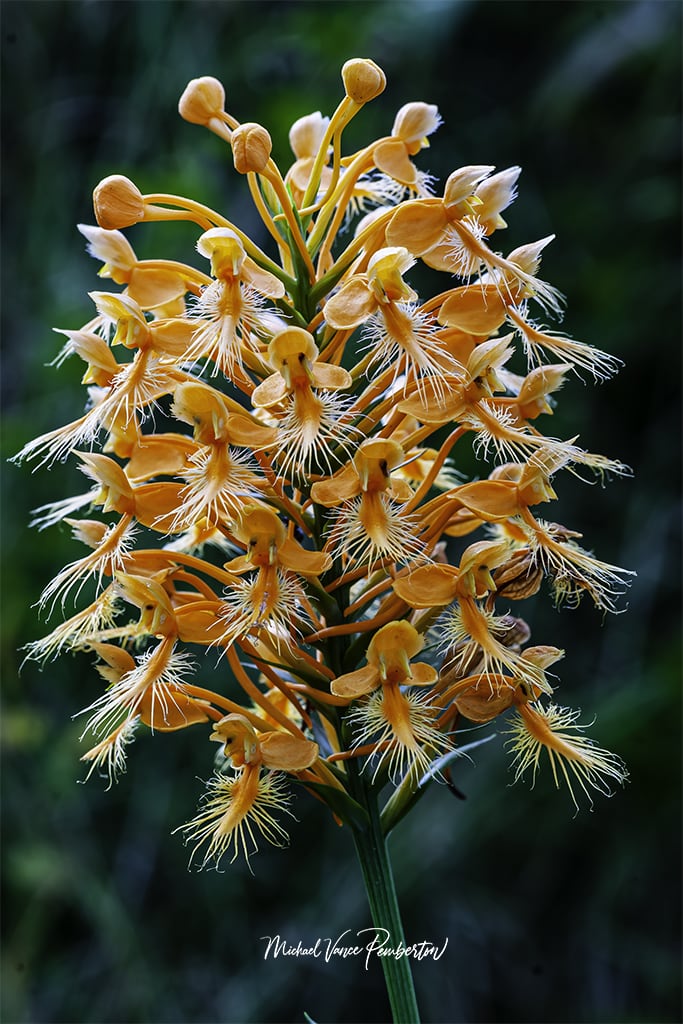
The allure of macro photography lies in its ability to bridge the gap between the ordinary and the extraordinary. We gain access to a hidden world of intricate patterns, textures, and colors by magnifying minuscule subjects. Through this exploration of the small and often overlooked details, we discover the true essence and significance of even the simplest objects.
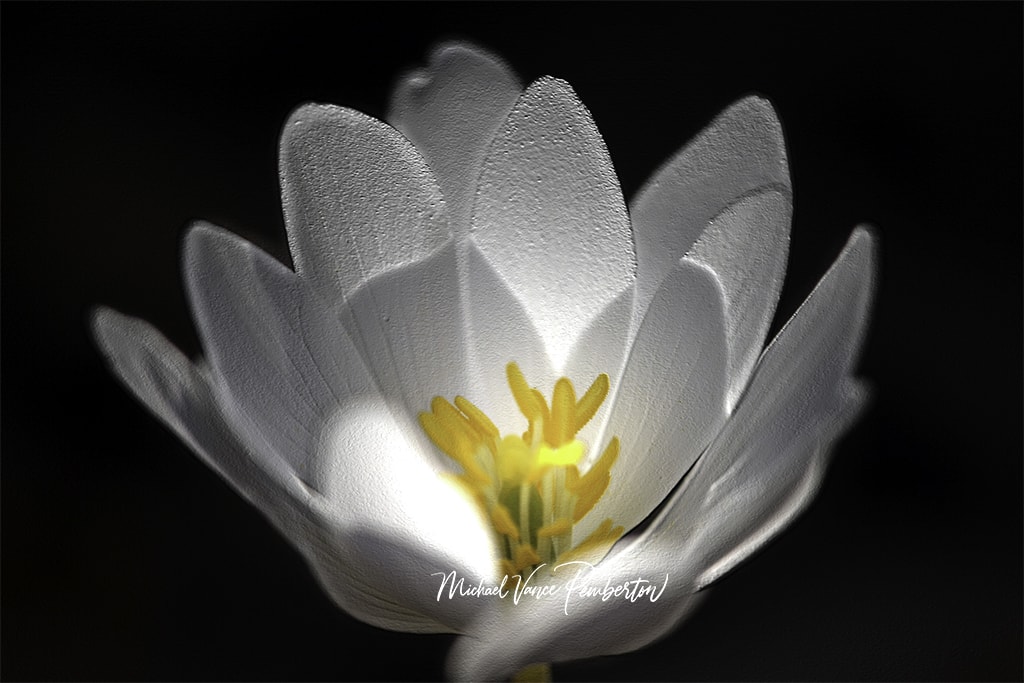
As a macro photographer, your lens becomes a portal to a dimension where a delicate insect’s wing resembles a stained-glass window, a dewdrop transforms into a glistening jewel, and the petals of a flower reveal a universe of tiny veins and pollen. This ability to show the hidden beauty within the mundane makes macro photography captivating and mesmerizing.
In this article, we embark on a journey into the enchanting world of macro photography. We will delve into essential techniques and share tips to help you refine your skills and excel in this fascinating art form. Whether you are just starting your macro photography adventure or seeking to enhance your existing knowledge, we aim to provide valuable insights and practical guidance to take your macro photography to the next level.
By understanding the equipment, such as dedicated macro lenses or alternative options like extension tubes or close-up filters, you will discover the tools necessary to capture the intricate details that define macro photography. We will explore the impact of depth of field and how to balance it with the desired level of detail, ensuring that your subjects are captivatingly sharp.
Moreover, we will delve into the art of focus and stability, emphasizing the importance of precision and using tripods or beanbags to steady your camera. Lighting, another crucial aspect, will be illuminated as we discuss the advantages of natural light, diffusers, reflectors, and dedicated macro lighting tools to enhance your subjects and create the desired mood.
Composition and background play a significant role in macro photography, and we will provide insights into framing, angles, and removing distractions to create visually compelling compositions. Additionally, we will touch on the importance of patience and observation, encouraging you to develop a keen eye for the small wonders surrounding us.
Lastly, we will explore the post-processing stage, where you can enhance your macro images through adjustments in contrast, sharpness, and color balance while maintaining the authenticity and integrity of the subject. Creative editing techniques and the careful use of cropping and straightening will also be discussed to add a personal touch to your macro photography.
By the end of this article, we hope to ignite your passion for macro photography and equip you with the knowledge and skills necessary to unlock the mesmerizing world of tiny details. So, grab your camera, open your eyes to the unseen, and embark on an extraordinary journey into the captivating art of macro photography.
Equipment:
Equipping yourself with the right gear becomes paramount to embark on your quest for exceptional macro shots. Consider investing in a macro lens specifically designed for close-up photography, as it can make a difference in capturing stunning macro images. A dedicated macro lens boasts exceptional optical quality, superior focus capabilities, and a 1:1 reproduction ratio, allowing you to capture subjects in life-size proportions.
One of the key advantages of a dedicated macro lens is its optical quality, specifically optimized for close-up work. These lenses are built to minimize distortions, aberrations, and other visual flaws, ensuring that the details of your subjects are rendered with the utmost clarity and sharpness. The precise engineering and advanced optics of macro lenses deliver superior image quality, enabling you to capture intricate details and textures with incredible precision.
Superior focus capabilities are another hallmark of dedicated macro lenses. They come equipped with advanced autofocus systems designed to handle the unique focusing challenges presented by macro photography.
Focusing quickly and accurately on tiny subjects, even at high magnifications, is crucial in capturing sharp, well-defined images. Macro lenses often feature focus limiters or focus distance scales that assist in achieving precise focus at various distances.
The 1:1 reproduction ratio offered by macro lenses is a significant advantage.
This ratio means that the image projected onto the camera’s sensor is the same size as the photographed subject. It lets you capture minute details at their height, producing stunning and lifelike macro images. This level of magnification can reveal intricate patterns, textures, and structures that are often invisible to the naked eye.
However, if investing in a macro lens is not feasible at the moment, alternative options can help you achieve a similar effect using standard lenses. Extension tubes and close-up filters are two commonly used accessories for macro photography. Extension tubes are hollow tubes between the camera body and the lens, increasing the lens-to-sensor distance.
This extension allows you to focus at much closer distances, achieving higher magnification for macro shots. On the other hand, close-up filters are like magnifying glasses that screw onto the front of the lens, enabling you to focus at closer distances and achieve magnification similar to that of a macro lens.
While extension tubes and close-up filters can provide a cost-effective entry point into macro photography, it’s worth noting that they may introduce some compromises in terms of image quality and convenience compared to dedicated macro lenses. Extension tubes can reduce the amount of light reaching the sensor, potentially requiring longer exposure times or higher ISO settings.
Close-up filters may introduce additional optical elements that can impact image quality, such as decreased sharpness or increased chromatic aberration. However, these accessories can still yield impressive results with proper technique and careful selection.
Investing in a macro lens explicitly designed for close-up photography is the ideal choice for achieving exceptional macro shots. The excellent optical quality, superior focus capabilities, and 1:1 reproduction ratio offered by dedicated macro lenses contribute to capturing intricate details with stunning clarity. However, if a macro lens is outside reach, extension tubes, and close-up filters provide viable alternatives that can still produce impressive macro images. Remember, the right equipment lays the foundation for your macro photography journey, unlocking a world of tiny wonders waiting to be explored.
Depth of Field:
In macro photography, achieving a desirable depth of field becomes a significant challenge due to the subject’s proximity. This close distance leads to a shallow depth of field, which means that only a small portion of the subject or a narrow plane of focus will be sharp while the rest of the image gradually falls out of focus.
To counteract this shallow depth of field and ensure that your subject is entirely in focus, it is recommended to use a small aperture or a higher f-number, such as f/11 or f/16. By choosing a smaller aperture, you are effectively narrowing the aperture opening, allowing less light to pass through the lens. This results in a greater depth of field, meaning that a more significant portion of the image will appear sharp and in focus.
However, it is essential to be mindful of a phenomenon called diffraction when using extremely small apertures. Diffraction occurs when light waves passing through a small aperture start to interfere with each other, causing a loss of overall image sharpness. While a smaller aperture can increase the depth of field, there is a trade-off with diffraction, which can reduce the overall sharpness and fine detail in your image.
Balancing depth of field and the desired level of detail is a crucial consideration in macro photography. It involves finding the optimal aperture setting to capture sufficient detail while maintaining a pleasing sharpness. It often requires experimentation to strike the right balance for each subject and composition.
Another technique to enhance the depth of field in macro photography is focus stacking. Focus stacking involves capturing multiple images of the same subject, each with a slightly different focus point, and then combining them in post-processing. By merging these images, you can create a final result that exhibits a greater depth of field than what could be achieved with a single shot. Focus stacking is particularly useful when photographing subjects with intricate details or when a wide depth of field is necessary.
Additionally, the distance between the camera, subject, and background can influence the perceived depth of field. The closer the subject is to the background, the more blurred the background will appear, which can create a pleasing separation and draw attention to the main subject.
In summary, macro photography often presents a shallow depth of field due to the close proximity to the subject. To increase the depth of field and ensure your subject is entirely in focus, using a small aperture with a higher f-number is recommended. However, remember the trade-off with diffraction and the potential reduction in overall image sharpness. Balancing depth of field with the desired level of detail requires careful consideration and experimentation. Additionally, techniques such as focus stacking and careful subject-background placement can further enhance the depth of field and create visually compelling macro images.
Focus and Stability:
In macro photography, achieving sharp focus is of utmost importance. The proximity to the subject magnifies any slight movement, making it challenging to capture tack-sharp images. Employing specific techniques and tools becomes crucial to overcome this challenge and maintain stability.
A tripod is one of the primary tools for ensuring stability in macro photography. A sturdy tripod provides a solid base for your camera, eliminating hand-held vibrations and minimizing the risk of blurriness. When selecting a tripod, opt for one that is sturdy, adjustable, and capable of supporting the weight of your camera and lens combination.
In addition to a tripod, you can also consider using a beanbag or a similar stabilizing device. Placing the camera on a beanbag can provide flexibility in positioning and stabilizing your setup, especially when working in uneven or challenging shooting environments where a tripod may not be feasible.
Choosing the right focusing method is also essential for achieving sharp focus in macro photography. Manual focus allows precise control over focusing, enabling you to select the exact focus point within the frame. This method is particularly useful when dealing with subjects with intricate details or when autofocus struggles to lock onto the desired area.
Another technique that can aid in achieving greater depth of field and sharpness is focus stacking. Focus stacking involves capturing multiple images of the same subject, each focused at a slightly different distance and later merging them in post-processing.
By combining these images, you can achieve a final result that exhibits a greater depth of field than possible in a single shot. Focus stacking is particularly beneficial when photographing subjects with three-dimensional textures or when a wide depth of field is desired.
To ensure precise focusing, utilizing the live view mode on your camera can be advantageous. Live view mode allows you to magnify the camera’s LCD screen image, making it easier to inspect details and fine-tune focus. This method provides a more accurate representation of the final image and enables you to make precise adjustments to achieve optimal focus.
Additionally, to minimize camera shake caused by pressing the shutter button, consider using a remote shutter release or the camera’s built-in self-timer feature. These options allow you to trigger the shutter without physically touching the camera, further reducing the risk of introducing unwanted motion blur Achieving sharp focus is crucial in macro photography, where even the slightest movement can result in blurriness. Utilizing a tripod or a beanbag to maintain stability can provide a solid foundation for your camera. Manual focus and live view mode offer precise focus control, ensuring optimal sharpness. Focus stacking techniques can increase the depth of field and capture greater detail. By implementing these techniques and tools, you can elevate the quality of your macro images and capture intricate details with exceptional clarity.
Lighting:
In macro photography, lighting plays a vital role in accentuating the intricate details of your subjects. Proper lighting techniques can reveal textures, reveal subtle nuances, and add depth to your macro images. Whether you utilize natural light or opt for dedicated macro photography lighting tools, understanding how light interacts with your subjects is critical to capturing stunning macro photographs.
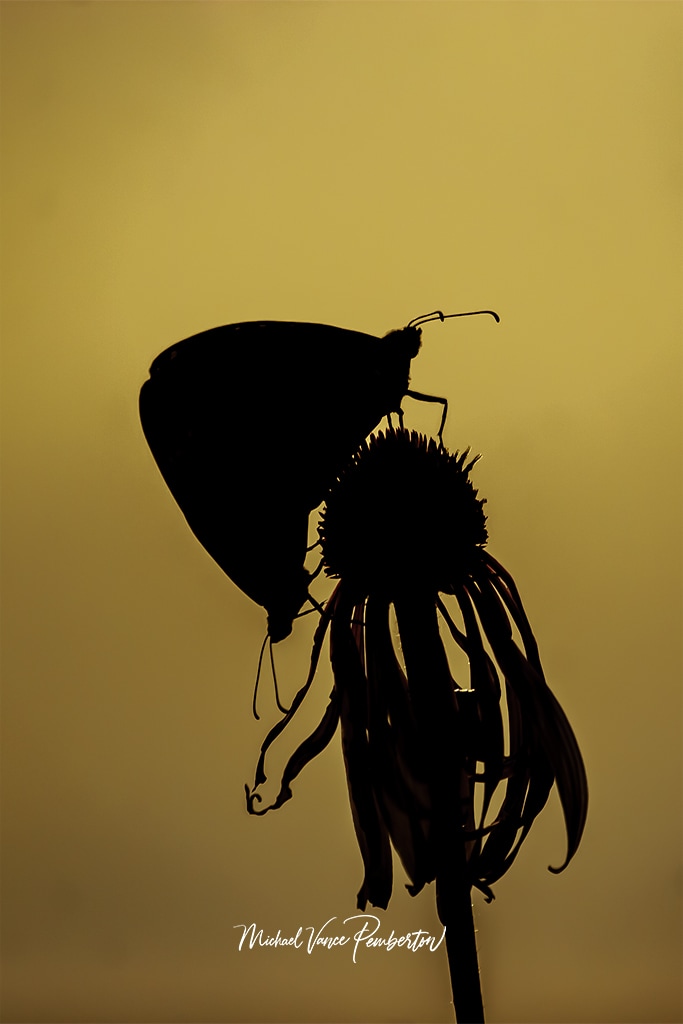
Natural light can be a fantastic resource for macro photography. Shooting outdoors during the early morning or late afternoon provides soft, diffused light that enhances the details and colors of your subjects. These times of the day, commonly called the “golden hours,” offer warm and gentle light with reduced harshness and contrast. The directional nature of the light during these hours can create interesting shadows and highlights, adding depth and dimension to your macro images.
Diffusers and reflectors can be invaluable tools to control and modify natural light. Diffusers, such as translucent fabrics or specialized diffuser panels, soften and scatter harsh light, creating a more even and pleasing illumination.
They can be placed between the light source and your subject to create a soft, diffused light that minimizes harsh shadows and highlights. Reflectors, on the other hand, are used to bounce and redirect light onto your subject. They come in various colors, such as silver, gold, and white, each offering different effects. Reflectors can help fill in shadows, add highlights, and enhance the overall illumination of your macro subjects.
Dedicated macro photography lighting tools can offer consistent and controlled illumination in scenarios where natural light is limited or not ideal. Ring flashes are popular choices among macro photographers. They consist of a circular flash unit surrounding the lens, providing even and shadow-free illumination directly onto the subject. Ring flashes are particularly effective in macro photography as they eliminate harsh shadows created by side lighting and provide uniform lighting across the subject.
Another option is LED light panels, which offer adjustable and continuous lighting. LED panels come in various sizes and configurations, allowing you to control the intensity and color temperature of the light. These panels can be positioned to provide a diffused and even light source, enabling you to highlight the intricate details of your macro subjects.
Experimenting with different lighting setups and techniques is crucial in macro photography. You can explore backlighting to create a translucent effect, side lighting to add depth and drama, or even experiment with colored gels to introduce creative products and moods.
Ultimately, the choice between natural light and dedicated lighting tools depends on the specific requirements of your macro subjects and the creative vision you wish to achieve. Both options offer unique advantages, and it’s worth exploring and adapting to different lighting conditions to capture the desired look and feel in your macro photographs.
Adequate lighting is essential in macro photography to bring out the intricate details of your subjects. Utilizing natural light during the golden hours provides soft illumination with reduced contrast. Diffusers and reflectors can be used to control and modify natural light, enhancing the quality of illumination. Alternatively, dedicated macro photography lighting tools like ring flashes or LED panels offer consistent and controlled lighting options. By understanding the characteristics of light and experimenting with various lighting techniques, you can capture macro images that reveal the hidden beauty of your subjects.
Composition and Background:
In the realm of macro photography, composition, and background play crucial roles in enhancing the overall impact of your images. By paying attention to these elements, you can create visually compelling compositions that showcase your macro subjects in the most captivating way.
One fundamental principle of macro composition is to simplify the scene and remove distractions and clutter. Macro photography often involves capturing small subjects within a limited frame, so it’s essential to ensure that the subject stands out and takes center stage. By decluttering the background and eliminating any elements that may draw attention away from the subject, you create a clean and uncluttered composition that allows the viewer’s focus to remain on the intricate details of your issue.
Utilizing a shallow depth of field is a technique commonly employed in macro photography to blur the background and create a pleasing bokeh effect. This technique helps isolate the subject from its surroundings, emphasizing its details and giving it a three-dimensional quality. To achieve this, use a wide aperture (smaller f-number) like f/2.8 or f/4 to narrow the depth of field and place the subject in sharp focus while intentionally blurring the background.
Experiment with different aperture settings to achieve the desired background blur and balance it with the level of detail you want to showcase.
Experimenting with different angles, perspectives, and framing techniques can transform your macro compositions. Macro photography offers a unique opportunity to explore the world from a miniature perspective. Get down to eye level with your subject, crouch or lie on the ground, or explore unusual angles to capture perspectives that are not typically seen. Changing your vantage point can reveal fascinating details, create depth, and add a sense of intimacy to your macro images.
Consider using different framing techniques to add interest and dynamism to your compositions. Fill the frame with your subject to create a bold and impactful image that emphasizes its details. Alternatively, leave some negative space around the subject to provide breathing room and draw attention to its intricate features. Experiment with different composition rules, such as the rule of thirds or leading lines, to guide the viewer’s eye and create visually balanced and engaging compositions.
Additionally, be mindful of the background itself. Look for complementary or contrasting colors, textures, or patterns that can enhance the overall visual impact of your macro photograph. A clean and uniform background can make your subject pop, while an interesting or harmonious background can add context or create a visual narrative.
Composition and background play vital roles in macro photography. Simplifying the scene, removing distractions, and ensuring the subject stands out are essential to creating impactful compositions. Utilizing a shallow depth of field can blur the background and highlight the subject while experimenting with different angles, perspectives, and framing techniques can add depth and visual interest. Pay attention to the background and consider its colors, textures, and patterns to enhance the overall visual impact of your macro photographs. By applying these techniques and exploring creative compositions, you can capture macro images that are visually compelling and tell a story through the intricate details of your subjects.
Patience and Observation:
Macro photography is a discipline that demands both patience and keen observation. In the realm of the small, extraordinary details and hidden beauty often reside. To truly excel in macro photography, investing time in studying your subjects and their environment is essential, allowing yourself to discover and appreciate the intricacies that may initially go unnoticed.
When engaging in macro photography, take the time to closely observe your subjects. Look beyond their immediate appearance and find interesting textures, patterns, colors, and shapes. When viewed up close, what may seem ordinary at first glance can reveal itself as a treasure trove of captivating details. From the delicate veins of a leaf to the intricate patterns on an insect’s wings, a world of visual richness is waiting to be explored.
One of the critical aspects of macro photography is being mindful of the tiny details. The beauty of macro photography lies in the ability to capture these details with precision and finesse. Develop a keen eye for the subtle and minute elements that make your subjects unique. Notice the play of light and shadow, the delicate curves, and the intricate structures that create a sense of wonder. By being attentive to these details, you can showcase the beauty and uniqueness of your subjects in a way that captivates viewers.
To enhance your macro photography skills, immerse yourself in the world of the small wonders. Spend time observing and photographing subjects from various angles and distances, experimenting with different compositions and lighting conditions. Learn about the characteristics and behaviors of the organisms or objects you photograph, which can help you anticipate moments and capture them at their most intriguing.
Furthermore, cultivating patience is essential in macro photography. Small subjects often require careful positioning, waiting for the right moment, and allowing them to become comfortable in their environment. Patience will enable you to connect with your subjects and capture them in their most authentic and exciting states. It allows you to capture fleeting moments and the unique expressions of the subjects you photograph.
Macro photography is an art that requires patience and attentive observation. Take the time to study and appreciate your subjects and their environment. Train your eye to notice the textures, patterns, colors, and shapes that may go unnoticed by others. Focus on the tiny details that make your subjects beautiful and unique. With patience and a keen eye for the world’s small wonders, you can significantly enhance your macro photography skills and create images that inspire awe and wonder.
Post-processing:
Post-processing is an integral and creative step in the world of macro photography. Once you have captured your macro images, editing software like Adobe Lightroom or Photoshop allows you to refine and elevate your photographs to their full potential. Post-processing offers a range of possibilities to enhance the visual impact, fine-tune details, and add a personal touch while maintaining the authenticity of the subject.
One of the primary adjustments you can make during post-processing is fine-tuning your image’s overall tonal balance and contrast. Adjusting contrast can help highlight the details and make your subject stand out. You can experiment with different contrast levels to achieve the desired mood and visual impact. Balancing the highlights and shadows can help maintain a balanced exposure and prevent any areas from becoming over or underexposed.
Another essential aspect to consider during post-processing is sharpness. Macro photography often requires precise focusing and attention to detail. In post-processing, you can enhance the sharpness of your image selectively, bringing out the intricate details of your subject. Be cautious not to oversharpen, as it can result in unnatural-looking artifacts.
It’s essential to strike a balance that maintains a natural appearance while emphasizing the desired level of detail.
Color balance is another aspect that can significantly impact the visual impact of your macro images. Adjusting the color temperature and white balance during post-processing allows you to achieve accurate and pleasing colors. You can experiment with different color tones, enhancing the vibrancy or creating a specific mood. Pay attention to the colors of your subject and the overall composition to ensure that the colors are faithful to the original subject while adding a touch of artistic interpretation if desired.
Cropping or straightening your image can be helpful if you feel the composition can be improved or if there are distracting elements at the edges. Cropping allows you to emphasize specific details or create a more balanced composition. Straightening the image can help align the subject or horizon, resulting in a visually pleasing and harmonious composition.
However, be mindful not to overcrop or straighten excessively, as it may impact the overall image quality and composition.
Post-processing also offers opportunities for creative editing techniques that can add a personal touch and artistic flair to your macro photographs. Experiment with adjustments such as selective color changes, vignetting, or creative filters to evoke a specific mood or enhance certain elements. Remember to maintain the authenticity of the subject while exploring these creative possibilities, ensuring that the edits enhance and complement the original image rather than overpower it.
Post-processing is an essential part of macro photography. You can fine-tune your images and elevate them to their full potential using editing software like Adobe Lightroom or Photoshop. Adjusting contrast, sharpness, and color balance enhances the visual impact of your macro photographs. Cropping or straightening the image can improve the composition if necessary. Exploring creative editing techniques adds a personal touch while maintaining the authenticity of the subject. With post-processing, you can truly bring out the beauty and uniqueness of your macro images, creating captivating and visually stunning results.
Conclusion: Macro photography offers a captivating journey into the world of tiny details, unveiling unseen beauty that often goes unnoticed. Applying the techniques and tips mentioned above can refine your skills and capture stunning macro images. Remember to experiment, explore different subjects, and allow your creativity to guide you. With practice and a keen eye for detail, you’ll unlock the potential of macro photography and create mesmerizing images that inspire and fascinate others.


Recent Posts
Twenty Years in the Wild: The Patience Behind Capturing the Swallow Migration.
The Colorado River near Castle Dome glowed with first light, the water turning from ink to molten copper as the desert woke. Out of the riparian thickets rose a living wave of thousands of Tree...
Hey there, fellow shadow chaser. If you’re reading this, you’ve probably stood in golden hour light, watched a bird, a car, or a lone tree melt into a perfect black shape against a blazing sky,...