
Low-light photography can be challenging, but with the proper techniques and equipment, you can capture stunning images in dimly lit environments. Here are some of the best tips to help you excel in low-light photography.
Use a tripod:
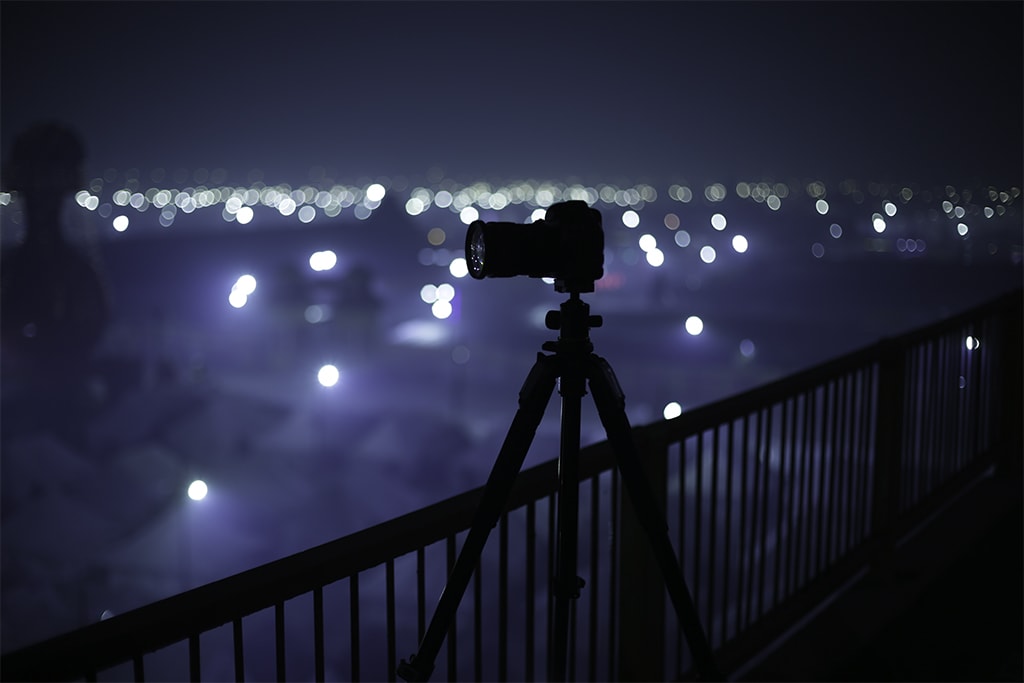
Using a tripod is an essential technique for low-light photography that can significantly improve the quality of your images. When shooting in dimly lit environments, the camera’s sensor needs more time to gather enough light to create a well-exposed photo. As a result, the shutter speed must be slowed down, making the camera more susceptible to even the slightest movement or shake. This is especially true when shooting with longer focal lengths or using telephoto lenses, as any camera movement is magnified.
With a tripod, it’s easier to keep the camera steady during longer exposures, and this can lead to frustratingly blurry or soft images. Even if you have a steady hand, it’s nearly impossible to maintain complete stillness for extended periods.
A sturdy tripod provides the ideal solution to this problem. Securely mounting your camera on a tripod eliminates the risk of unintentional camera shake, ensuring sharpness and clarity in your low-light shots. The stability offered by a tripod allows you to use longer exposure times, which can be crucial for capturing beautiful nightscapes, star trails, or the flow of light in urban settings.
Moreover, using a tripod opens up creative possibilities with techniques such as long-exposure photography. By leaving the shutter open for several seconds or even minutes, you can capture the mesmerizing movement of flowing water, streaks of light from passing cars, or the breathtaking beauty of the night sky filled with stars.
When selecting a tripod for low-light photography, look for one sturdy and well-built to handle the weight of your camera and lens combination. Additionally, consider features like adjustable leg angles, a ball or fluid head for smooth movement, and quick-release plates for convenience. A heavier tripod will offer better stability if you’re shooting in challenging environments, like rough terrains or windy conditions.
In summary, using a tripod in low light conditions is a game-changer for photographers seeking to capture sharp, stunning images. It eliminates camera shake and allows for longer exposures, allowing you to explore the creative potential of low-light photography while maintaining exceptional image quality. So, whether capturing the beauty of a cityscape at dusk or shooting the night sky, a sturdy tripod should be an essential tool in your low-light photography kit.

Open up the aperture:
Understanding the concept of aperture and how it affects low-light photography is crucial for achieving visually striking and captivating images in challenging lighting conditions. The aperture refers to the opening in the lens through which light enters the camera. It is represented by an f-stop number, with lower f-stop values indicating wider apertures.
In low-light situations, the camera sensor often has insufficient light to capture a well-exposed image at smaller apertures (higher f-stop numbers). Choosing a wide aperture (low f-stop number) like f/1.8, f/2.8, or f/4 allows more light to pass through the lens and reach the camera’s sensor. This increase in light intake results in brighter images, making it easier to capture correctly exposed photographs even in dimly lit environments.
However, the benefits of a wide aperture extend beyond just brightening the image. A lens with a large maximum aperture also provides a shallow depth of field. This means that when you shoot with a wide aperture, the area in focus (the depth of field) becomes narrower, while the foreground and background blur out in a pleasing, bokeh effect.
This effect effectively isolates your subject from distracting or cluttered backgrounds, drawing attention solely to the main focal point of the image.
Using a shallow depth of field in low-light photography allows you to emphasize your subject, making it stand out prominently against its surroundings. This technique is instrumental in portrait photography, where the subject’s face remains sharp and detailed while the background pleasantly melts away into a soft, dreamy blur. Additionally, it can highlight specific elements in landscapes or still life shots, directing the viewer’s attention exactly where you want it.
To achieve the maximum potential of a wide aperture, invest in lenses with large maximum apertures, like prime lenses. Prime lenses with wide apertures, such as 50mm f/1.8 or 35mm f/1.4, are famous for low-light photography due to their ability to gather ample light and produce stunning bokeh.
It’s worth noting that using a wide aperture might require careful focusing, as the narrow depth of field can be challenging to control, especially when shooting close-up subjects. It’s advisable to focus on the subject’s eyes in portraits or use manual focus for precision and creative control.
Employing a wide aperture in low light photography not only allows more light into the camera sensor, brightening the image, but also enables you to create a beautifully blurred background, drawing attention to your subject and adding a touch of artistic flair to your photographs. So, when shooting in dimly lit environments, reach for a lens with a large maximum aperture and explore the wonders of shallow depth of field to enhance your low-light images and tell more compelling visual stories.

Adjust ISO settings:
ISO sensitivity is a fundamental tool in low-light photography that allows you to adjust your camera’s sensor’s light-gathering capabilities. Increasing the ISO value makes the sensor more responsive to light, enabling you to capture correctly exposed images even in challenging lighting conditions.
Raising the ISO becomes necessary in low-light situations when there isn’t enough available light to achieve a well-exposed photo with the desired shutter speed and aperture. It brightens the image by amplifying the signal from the sensor, effectively boosting the exposure. This flexibility is precious when using a tripod, or broader aperture is not feasible or when capturing fast-moving subjects.
However, while a higher ISO setting helps in low light, it comes with a trade-off: digital noise and graininess. Noise appears as random, unwanted speckles or splotches in an image and can degrade image quality significantly. The sensor’s sensitivity is lower at lower ISO values, resulting in cleaner and smoother images. As you increase the ISO, the signal amplification can introduce more noise into the picture.
To achieve the best image quality in low-light photography, balancing ISO and noise reduction is essential. The goal is to find the highest ISO value that maintains an acceptable noise level while producing a well-exposed image. The balance varies depending on the camera model, as newer camera sensors perform better at higher ISOs with less noise.
One way to manage noise is using the camera’s built-in noise reduction settings. Some cameras offer options for in-camera noise reduction, which processes the image to reduce noise at higher ISO settings. However, be cautious with this feature, as excessive noise reduction can lead to a loss of fine details and sharpness in the image.
Post-processing software also provides noise reduction tools that allow you to fine-tune the noise reduction according to your preferences. These tools can be beneficial in achieving optimal results, especially when shooting at higher ISO values.
Additionally, shooting in RAW format gives you more control over noise reduction during post-processing. RAW files contain more data and provide greater flexibility in adjusting noise reduction settings without sacrificing image quality. This way, you can tailor the noise reduction to suit each image based on its specific noise characteristics.
Increasing the ISO sensitivity is a powerful technique in low-light photography, enabling you to capture correctly exposed images in challenging lighting conditions.
However, consider the trade-off, as higher ISO values can introduce digital noise and graininess. To achieve the best image quality, find the right balance between ISO and noise reduction, judiciously utilize in-camera noise reduction settings, and leverage the advantages of shooting in RAW format. With practice and experimentation, you can master managing ISO to achieve outstanding low-light photographs with minimal noise interference.

Shoot in RAW format:
Shooting in RAW format is a game-changer for low-light photography, providing photographers unparalleled control over their images. RAW files retain all the unprocessed data captured by the camera’s sensor, resulting in an image that contains more information and dynamic range than JPEG or other compressed formats.
This abundance of data gives you greater flexibility and creative freedom during post-processing, especially in challenging low-light conditions.
In low-light situations, achieving the perfect exposure can be tricky, as more than the available light may be required to capture all the details in the scene. When shooting in RAW, you have the advantage of being able to fine-tune the exposure during post-processing without sacrificing image quality.
You can adjust the brightness and contrast levels, recover highlight and shadow details, and fine-tune the overall exposure to bring out the best in your low-light photographs.
Furthermore, white balance can be particularly challenging in low light, as artificial lighting and mixed light sources can cast different color temperatures. In JPEG images, the white balance is often applied and fixed at the time of capture, leaving you with limited options for correction.
In contrast, RAW files allow you to adjust the white balance after the fact, accurately correct any unwanted color casts, and achieve a more natural and visually pleasing result.
Another critical advantage of shooting in RAW in low-light photography is noise reduction. As mentioned earlier, higher ISO settings may introduce digital noise and graininess into your images.
With RAW files, you can apply noise reduction during post-processing, fine-tuning the amount of noise reduction applied to each image based on its specific characteristics. This way, you can balance reducing noise and preserving essential details, resulting in cleaner, more professional-looking, low-light photographs.
In addition to exposure, white balance, and noise reduction, shooting in RAW lets you control other essential settings such as sharpness, saturation, and color adjustments. These adjustments can significantly impact your images’ final look and feel, allowing you to tailor them to match your artistic vision.
It’s important to note that shooting in RAW requires post-processing to convert the RAW data into a viewable image format (e.g., JPEG or TIFF). This additional step adds to the workflow, but flexibility and image quality benefits make it well worth the effort, especially in low-light photography.
Shooting in RAW format is necessary for low-light photography, offering unmatched control and creative possibilities during post-processing. The ability to adjust exposure, white balance, noise reduction, and other settings without compromising image quality is invaluable when dealing with challenging lighting conditions. By harnessing the full potential of RAW files, you can elevate your low-light photography to new heights and produce stunning, professionally processed images that truly capture the moment’s essence.

Utilize image stabilization:
Built-in image stabilization (IS or VR) is a valuable feature found in many modern cameras and lenses, and it plays a crucial role in enhancing the quality of handheld shots, especially in challenging low-light conditions. When shooting without a tripod, the risk of camera shake increases, leading to blurry and unsteady images. However, with image stabilization activated, photographers gain a powerful tool to counteract the effects of handshakes and achieve sharper results.
In low-light situations, slower shutter speeds are often necessary to allow enough light to reach the camera sensor. Unfortunately, slower shutter speeds amplify the impact of even the slightest camera movements.
This is where image stabilization proves its worth. The stabilization system compensates for camera shake by physically moving lens elements or adjusting the sensor position. Doing so effectively stabilizes the image and minimizes the appearance of blur caused by unsteady hands.
Image stabilization becomes especially beneficial when photographing in dimly lit environments with limited available light. It enables photographers to shoot at shutter speeds that would otherwise be considered too slow for handheld photography. This extra stability opens up creative possibilities, allowing for capturing scenes with natural light and ambiance without needing a tripod.
Image stabilization is particularly advantageous when shooting with longer focal lengths or telephoto lenses, as camera shake is more pronounced at these magnifications. It also benefits those capturing fast-moving subjects in low light, such as in event photography or photographing wildlife in dimly lit environments.
However, it’s important to remember that image stabilization has its limits. While it can significantly reduce the effects of minor camera shake, it may not be entirely effective in extreme situations, such as when using prolonged shutter speeds or capturing very long exposures. In such cases, a tripod remains the most reliable option.
For photographers with image-stabilized lenses, it is essential to understand the various modes of stabilization offered. Some lenses provide:
- Options for panning mode (ideal for tracking moving subjects)
- Dual-axis stabilization (horizontal and vertical movement).
- Even tripod-specific methods deactivate stabilization when mounted on a stable support.
Activating built-in image stabilization in your camera or lens is a powerful technique to mitigate the effects of camera shake during handheld shots, especially in low-light scenarios where slower shutter speeds are necessary. It expands the possibilities of shooting without a tripod, allowing for greater flexibility in challenging lighting conditions. By mastering this feature, photographers can achieve sharper, more stable images, resulting in a higher likelihood of capturing the perfect moment even in the most challenging low-light situations.

Opt for fast lenses:
Lenses with wider apertures, often called “fast lenses,” are a boon for low-light photography enthusiasts. The term “fast” describes these lenses because of their ability to gather more light compared to lenses with smaller maximum apertures. Fast lenses typically have a wide maximum aperture, such as f/1.8 or f/2.8, which allows a more significant amount of light to enter the camera sensor.
Fast lenses become invaluable tools in low-light photography, where the available light may be limited. As the aperture widens, the camera can use faster shutter speeds, resulting in well-exposed images even in dimly lit environments. This capability is particularly advantageous when using a flash or tripod, such as candid moments, events, or street photography, which may not be feasible or desired.
The wider aperture brightens the image and offers several other benefits that significantly enhance the lens’s performance in challenging lighting conditions. One of the key advantages is the ability to achieve a shallow depth of field.
With a wide aperture, the area in focus becomes narrower, and the background softly blurs out. This effect, known as bokeh, helps isolate the subject from distracting backgrounds, drawing attention to the main focal point and creating a sense of depth and dimension in the photograph.
Fast lenses also excel at capturing images with faster-moving subjects in low-light situations. By allowing more light into the camera, the lens can use faster shutter speeds, which effectively freeze the action, making it ideal for photographing sports, wildlife, or any fast-paced event in challenging lighting.
Moreover, fast lenses often exhibit superior optical performance compared to their slower counterparts, providing sharper images and better contrast, even when shooting wide open (at the maximum aperture). These lenses are designed with high-quality glass elements and advanced coatings that help minimize aberrations and lens distortions, resulting in impressive image clarity and overall image quality.
For portrait photographers, fast lenses are highly favored due to their ability to create pleasing background blur, which beautifully highlights the subject while softening distractions. This creamy bokeh effect can add an artistic touch to portraits and elevate the overall aesthetic of the image.
However, it’s essential to recognize that fast lenses can be relatively more expensive than lenses with smaller apertures, and they may also be bulkier and heavier due to the more significant glass elements required for wider apertures. Additionally, shooting at the widest aperture can lead to reduced depth of field, requiring precise focusing techniques to ensure the subject remains sharp.
Fast lenses with wider apertures are exceptional tools for low-light photography. Their ability to gather more light and create a shallow depth of field makes them well-suited for capturing stunning images in challenging lighting conditions. Whether a portrait, event, or wildlife photographer, investing in a fast lens can significantly improve your low-light photography capabilities, allowing you to create breathtaking images with superb sharpness, stunning bokeh, and outstanding overall performance.

Use long exposures creatively:
Experimenting with long-exposure shots opens up creative possibilities for photographers, especially in low-light settings. By extending the duration of the exposure, photographers can capture fascinating and unique effects that are not visible to the naked eye. Long-exposure photography is a powerful technique to convey motion, capture light trails, and create captivating nightscapes that mesmerize viewers.
One of the most common applications of long-exposure photography is capturing light trails. This technique is often used in urban settings, where moving vehicles, bicycles, or even people create streaks of light as they pass through the frame during the long exposure. The resulting images showcase a bustling city’s vibrant energy and dynamism, with colorful light trails crisscrossing the streets and highways.
Long exposure shots can also capture motion blur deliberately and artistically. For instance, photographing a waterfall or a flowing river with a long exposure smoothens the water’s movement, creating a dreamy, ethereal effect. Similarly, using long exposure on a crowded street can transform the bustling crowd into a gentle blur, emphasizing the transient nature of human movement.
At night, long-exposure photography becomes even more captivating, allowing photographers to create mesmerizing nightscapes. The camera sensor accumulates light from various sources, including city lights, stars, and even the moon, by keeping the camera’s shutter open for several seconds or even minutes. This results in stunning nighttime images with beautifully illuminated city skylines, starry skies, or serene landscapes under the moonlight.
Minimizing camera shake is crucial to achieve sharp and clear results when attempting long-exposure photography. Even the slightest movement can introduce blur and reduce image quality. Photographers can use a remote shutter release or the camera’s built-in timer to combat this. These tools enable photographers to trigger the shutter without physically touching the camera, eliminating the risk of camera shake caused by pressing the shutter button manually.
A remote shutter release is a handheld device that connects to the camera, allowing photographers to trigger the shutter from a distance. It comes in wired and wireless options, providing convenience and flexibility during long exposure shots.
Alternatively, the camera’s built-in timer can be a cost-effective option to reduce camera shake. Setting a brief delay, typically 2 or 5 seconds, after pressing the shutter button gives the photographer enough time to step away from the camera, minimizing any potential vibrations caused by the initial button press.
Long-exposure photography is a captivating technique that unlocks creative possibilities in low-light settings. From capturing mesmerizing light trails and motion blur to creating stunning nightscapes, long exposure allows photographers to produce visually compelling images that tell unique and artistic stories. Photographers can ensure sharp and high-quality results by employing a remote shutter release or the camera’s timer to reduce camera shake, making long-exposure photography a rewarding and satisfying pursuit for those seeking to push the boundaries of their creativity.

Avoid using flash when possible:
The use of flash in low-light settings can be a tricky proposition for photographers. While it can help illuminate otherwise too-dark scenes, it also comes with the risk of producing harsh lighting and unflattering shadows. Therefore, when shooting in low light, it is advisable to rely on natural or ambient light as much as possible to preserve the scene’s natural ambiance and mood.
One of the main challenges with using direct flash in low light is that it can create harsh, stark lighting, washing out colors and flattening the subject’s features. The light emitted from the flash is often too intense and direct, leading to unappealing results.
In addition, sharp and defined shadows can be cast behind the subject, which can be distracting and unflattering, particularly in portrait photography.
To overcome these issues, photographers can explore alternative flash techniques that produce softer, more flattering results. One practical approach is to use an external flash with a diffuser. A diffuser is a simple accessory that attaches to the front of the flash and spreads the light, creating a more even and gentle illumination. The diffused light helps soften shadows and creates a natural-looking glow on the subject, making it ideal for portrait photography or capturing scenes with a more subtle and pleasant light.
Another technique to soften flash lighting is to bounce the flash off walls or ceilings. Instead of directing the flash directly at the subject, the photographer points the flash towards a nearby surface, such as a wall or ceiling. The cover acts as a natural reflector, diffusing the light and spreading it evenly across the scene. This bounce flash method produces softer, more flattering lighting, especially indoor shots.
Additionally, using a flash with adjustable power settings allows photographers to control the flash output, preventing overexposure and ensuring that the flash’s intensity complements the existing ambient light. Balancing the flash output with the available light is crucial to achieving a natural and harmonious result.
However, even with these techniques, there will be situations where using flash is unavoidable. In such cases, photographers can also consider using a flash with a swivel head, allowing for more flexibility in positioning the flash for bounce lighting. Additionally, using gels or modifiers can help adjust the flash’s color temperature to match the ambient light, ensuring a seamless blend between the two light sources.
While flash can be a valuable tool in low-light settings, it requires finesse and careful consideration to avoid producing harsh lighting and unflattering shadows. It is best to rely on natural or ambient light whenever possible to preserve the scene’s atmosphere. If flash is necessary, techniques such as diffusers, bounce flash, and adjusting flash power can soften the lighting and create more pleasing and natural-looking results. By mastering these flash techniques, photographers can confidently handle low-light situations, ensuring their images stand out with beautifully balanced and flattering lighting.

Master manual focus:
In dimly lit scenes, achieving accurate autofocus can be challenging for cameras. The limited available light can cause autofocus systems to hunt or even fail to lock onto the subject properly. As a result, photographers often encounter frustrating situations where the intended focal point remains blurry, or the autofocus continuously refocuses without success. In such scenarios, mastering manual focus becomes a valuable skill that empowers photographers with greater control and precision over achieving sharp focus, particularly in low-contrast scenes.
When focusing manually, photographers take direct control over adjusting the focus ring on the lens. This hands-on approach allows them to fine-tune the focus until the subject appears sharp and clear in the viewfinder or the camera’s LCD screen.
In dimly lit environments, manual focus ensures that the photographer, not the camera’s autofocus system, determines the exact focus point. This level of control becomes crucial when photographing subjects with intricate details, such as portraits with shallow depth of field or macro shots, where precision in focusing can make or break the final image.
Moreover, low-contrast scenes pose an additional challenge for autofocus systems. In situations with slight variations in brightness and contrast between the subject and its surroundings, autofocus may struggle to identify and lock onto the intended focus point.
Manual focusing in these scenarios allows photographers to bypass the limitations of autofocus and use their judgment to determine where the sharpest focus should be. By visually assessing the subject’s details and adjusting the focus ring accordingly, photographers can ensure that the most critical elements of the scene are in focus, even in challenging low-contrast situations.
Learning to focus manually also encourages photographers to engage more actively with their subjects and scenes. It prompts them to slow down, observe the composition, and make deliberate decisions about what should be in focus. This intentional and mindful approach to focusing can lead to more thoughtful and impactful photographs as photographers become more attuned to the nuances of their subjects and the visual elements that contribute to a compelling image.
While manual focus may initially seem daunting, modern cameras often provide tools to achieve accurate focus manually. Features such as focus peaking, which highlights in-focus areas, or magnification, which enlarges the view to aid in precise focusing, are invaluable aids when working in low light or low contrast conditions.
In dimly lit scenes where autofocus struggles, mastering manual focus becomes an essential skill for photographers seeking greater control and accuracy over their focus. By taking control of the focus ring, photographers can ensure that the most critical elements of the scene are sharp and clear, especially in low-contrast situations. Embracing manual focus also encourages a more deliberate and mindful approach to photography, fostering a deeper connection with the subjects and producing more thoughtful and impactful images. With practice and familiarity with their camera’s manual focus aids, photographers can confidently tackle low-light challenges and produce stunning images that showcase their artistic vision.

Bracket your shots:
Exposure bracketing is a powerful and versatile technique that can significantly enhance the chances of capturing the best possible image, especially in challenging lighting conditions. This method involves shots at different exposure levels, typically with an underexposed, correctly exposed, and overexposed picture. Photographers use exposure bracketing to ensure they have multiple versions of the same scene, each with a different brightness level, providing more options during post-processing.
In challenging lighting situations, such as high-contrast scenes with bright highlights and deep shadows or scenes with unpredictable and rapidly changing light, capturing the ideal exposure in a single shot can be difficult. With exposure bracketing, photographers hedge their bets by capturing multiple exposures, effectively capturing a more comprehensive scene dynamic range.
The underexposed shot in the bracketing series captures the scene’s darkest areas, preserving details in highlights while allowing the shadows to appear darker. This shot helps prevent the highlights from getting blown out and losing essential detail. On the other hand, the overexposed photo captures the brightest parts of the scene, retaining elements in the shadows while allowing the highlights to appear more radiant.
This ensures that the shadow areas do not turn into featureless black patches. Finally, the correctly exposed shot aims to capture a well-balanced exposure that retains excellent detail throughout the scene.
With this bracketed set of images, photographers can later select the best-exposed version of the scene during post-processing. They can blend or merge the images using HDR (High Dynamic Range) techniques to create a final image that combines the best aspects of each exposure, resulting in a photograph with enhanced detail, balanced disclosure, and reduced loss of highlight or shadow information.
Exposure bracketing is particularly useful in landscape photography, where capturing scenes with varying light levels can be challenging due to elements like bright skies and dark foregrounds. It is also beneficial for interior photography when dealing with windows that let in bright sunlight, causing stark contrasts between the indoor and outdoor areas.
Modern cameras often offer automatic exposure bracketing (AEB) modes, which streamline the process by automatically capturing a sequence of bracketed shots with different exposure settings. Additionally, some cameras provide settings to customize the bracketing range and the number of images in the bracketed series.
Exposure bracketing is a valuable technique that helps photographers tackle challenging lighting conditions and achieve the best possible image. By capturing a range of exposures in a bracketed series, photographers ensure they have the necessary data to create a final image with optimal exposure and dynamic range during post-processing. Whether dealing with high-contrast landscapes, tricky interior scenes, or rapidly changing light conditions, exposure bracketing empowers photographers to overcome exposure challenges and produce striking and well-balanced images that truly showcase the scene’s beauty.
Conclusion: Low-light photography presents a unique and rewarding challenge for photographers. It requires technical expertise, creative vision, and adapting to ever-changing lighting conditions. With the proper techniques and equipment, photographers can capture stunning and evocative images that convey the mood, atmosphere, and beauty of dimly lit environments. From mastering exposure settings, utilizing image stabilization, choosing fast lenses to embrace extended exposure techniques, and understanding the benefits of shooting in RAW, low-light photography offers a canvas for artistic expression and storytelling. By embracing the intricacies of low-light photography and pushing the boundaries of their creativity, photographers can unlock the hidden beauty in darkness and illuminate captivating moments that might otherwise go unnoticed.


Recent Posts
Twenty Years in the Wild: The Patience Behind Capturing the Swallow Migration.
The Colorado River near Castle Dome glowed with first light, the water turning from ink to molten copper as the desert woke. Out of the riparian thickets rose a living wave of thousands of Tree...
Hey there, fellow shadow chaser. If you’re reading this, you’ve probably stood in golden hour light, watched a bird, a car, or a lone tree melt into a perfect black shape against a blazing sky,...