

I got started in photography in 2002 when my aunt Kathey ran into her house and said, get my camera. There’s a tornado coming!
That was it. I was hooked. For years to come, I have lived and breathed photography. My aunt gave me books on photography and nature books about weather and plants to read. I know how difficult it is when you’re starting. There are so many parts that have to come together to make images that you love. Photos you are proud to share with others. So continue reading to take your photography to a whole new level.
Once I learned these 15 things, my photography went to a whole new level.
- MANUAL MODE.
- ISO.
- EXPOSURE.
- EXPOSURE COMPENSATION.
- WEATHER.
- WHITE BALANCE.
- SHUTTER RELEASE.
- APERTURE.
- DEPTH OF FIELD.
- BURST MODE.
- FOCAL LENGTH.
- LONG EXPOSURE.
- METERING.
- NOISE.
- RAW OR JPG.
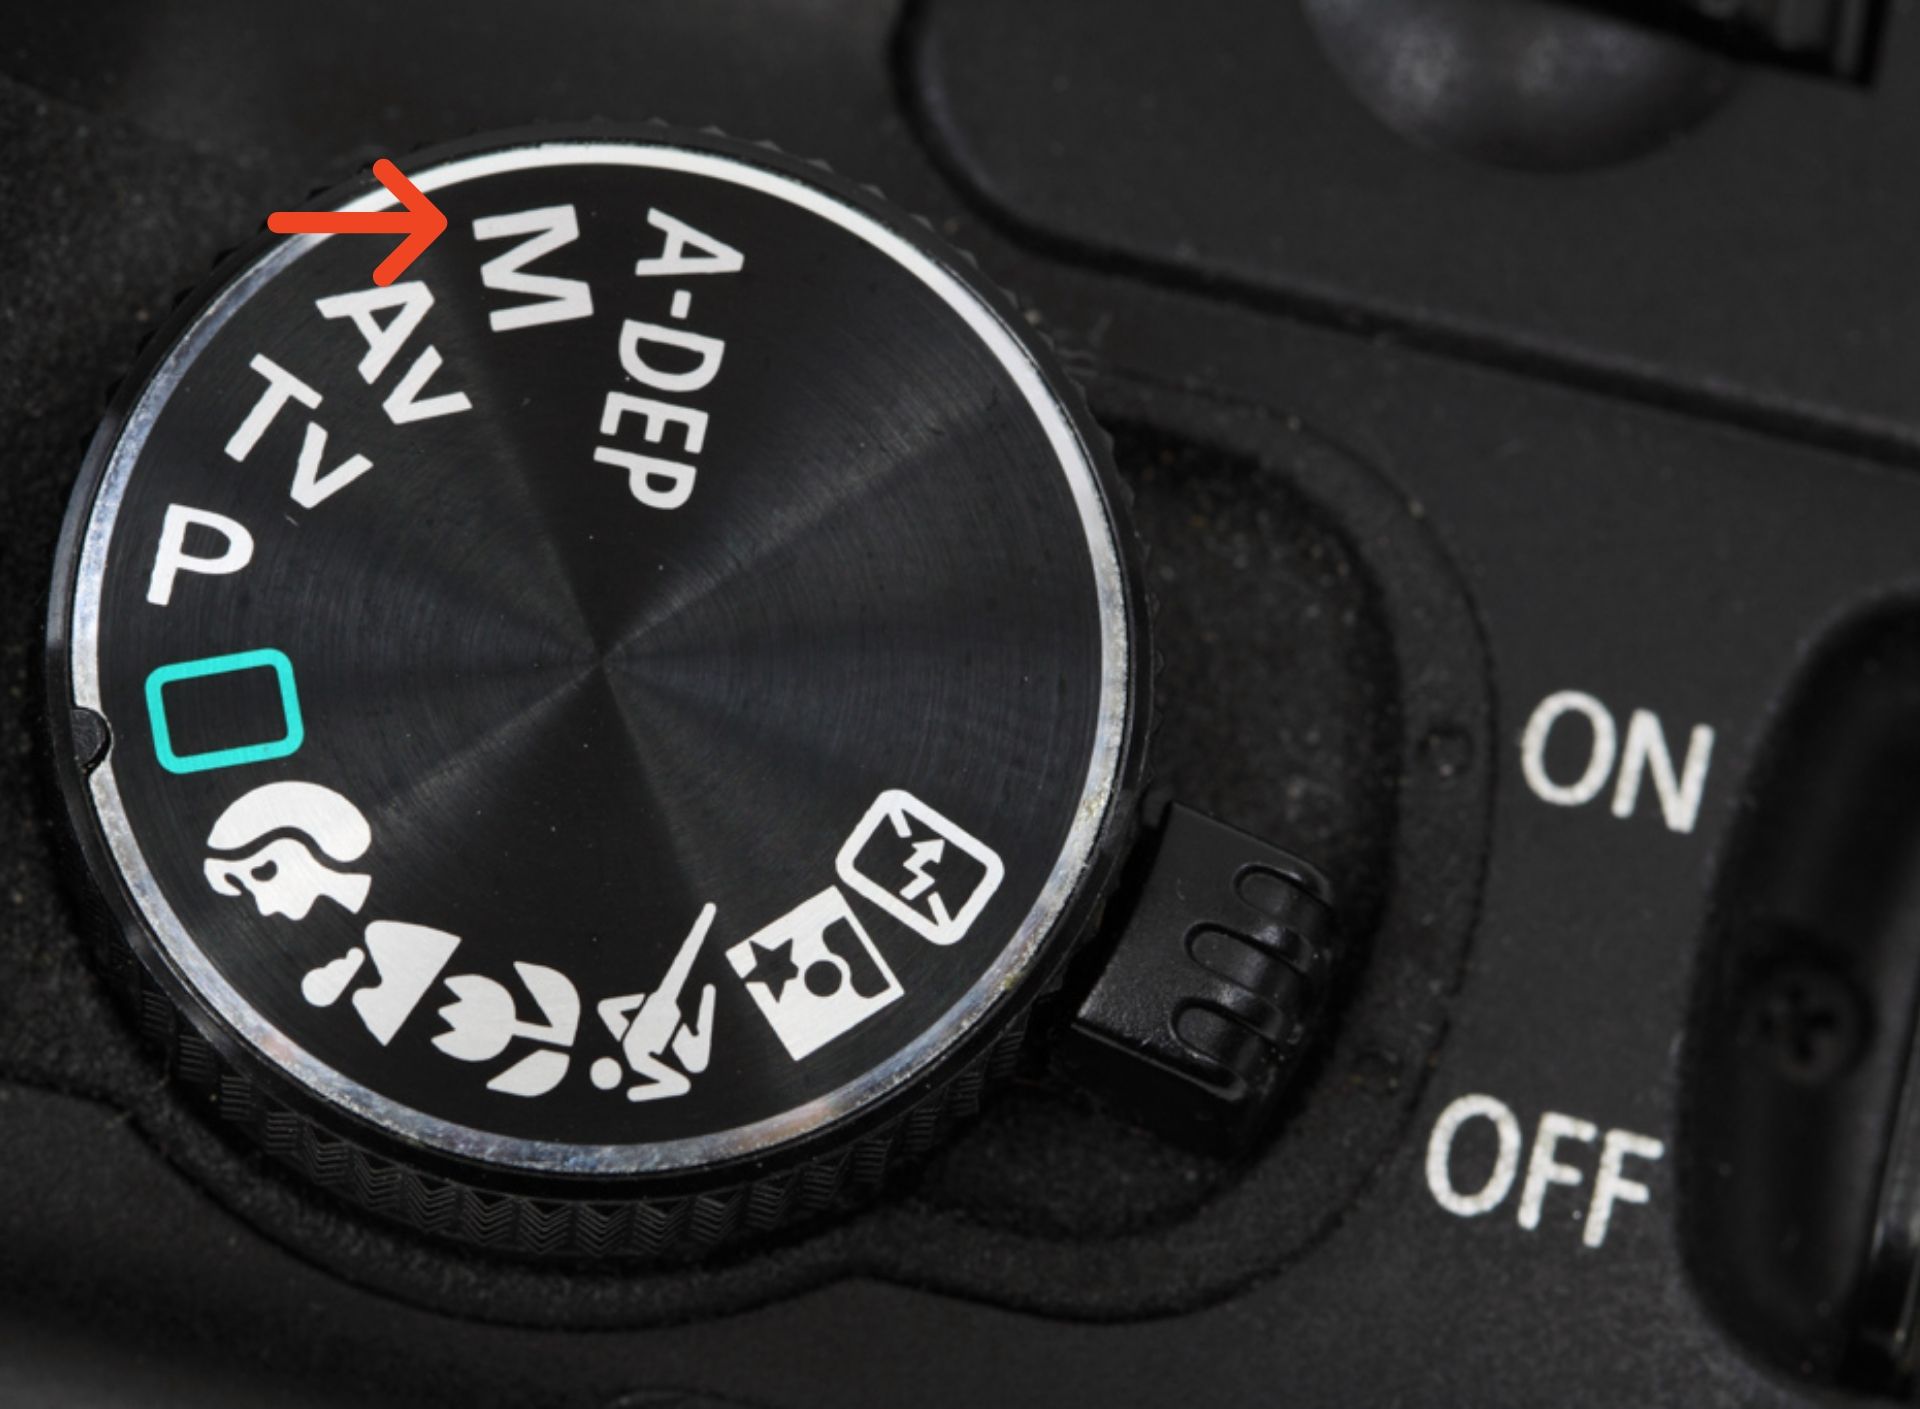
Manual Mode.
Using your camera in manual mode is a must when you start learning about photography. That knowledge alone will teach you almost everything you need to know.
Manual mode lets you control shutter speed, ISO, and aperture. I suggest that people start out only using manual mode because you will see how all three in different combinations can change how an image turns out by experimenting with them while your taken photos.
ISO.
ISO refers to your camera’s sensor’s sensitivity to light. For example, let’s say you use an ISO of 100 because it’s a bright day and you’re photographing a beautiful mountain scene. Using an ISO of 100 means your sensor isn’t very sensitive to light.
You now are outside on a cloudy day, plus you are photographing birds. You might use an ISO like 400 or maybe an ISO of 1000. Doing that will make your camera’s sensor very sensitive to light.

Exposure.
In simple terms, exposure is how light or dark an image is.
When you expose light to your camera, it exposes light to your sensor, which is part of the process of creating an image. If you have a photo that is too dark, it is considered underexposed. That means not enough light reached your sensor.
If you have a photo that is too bright, it is considered to be overexposed. That means too much light reached your sensor. Exposure is a combination of aperture, shutter speed, and ISO.
Exposure Compensation.
If you think you would like to under-expose an image, you can use that feature on your camera. The same is for over-exposing an image.
The term that is used most is called stops of light, with the negative numbers creating a darker image and positive ones creating a brighter image.
Weather.
It plays a huge role in photography. Something we need is light and shade. Weather creates that for use. With experience, you know not to go out in the middle of the day because the light will be harsh.
What about a clear blue sky day? That’s ok when the sun is lower in the sky. It will cast longer and softer shadows in our images. Going out on a partly cloudy day is the best. The clouds filter the sun’s light. Having clouds help create depth in your pictures also.
White Balance.
What is white balance, and why is it important. White balance is a setting on your camera which controls how colors are captured in different types of light. Light has different color temperatures that range from cool blue to warm orange.
Knowing which one to use is important because using the wrong setting can ruin your images by having an unwanted color cast in your photographs.
Shutter Release.
Simply put, it’s the button you push to take photos.
Aperture.
Basically, an aperture is the size of the opening of your lens. F-stops measure aperture: let’s say you try a small f-stop of f/5.6, which is a wide opening and lets in a lot of light. A large f-stop like f/22 lets in less light.
An example is when to use an f-stop like f/5.6—photographing birds would be one reason to use that f-stop. Or maybe you’re doing some macro photography.
F-stops like f/14 f/22 are used a lot in landscape photography. Aperture is significant because it is one of the three camera settings that determine the exposure of your image.
Depth of Field.
Depth of field is how much an image is in focus. For example, take a look at most landscape images there sharp from top to bottom because of the extensive range of depth of field.
Portrait images often have a soft background, because of a shallow depth of field, and the subject in front is sharp.
Burst Mode.
Burst mode is frames per second. Hold down your shutter release button and fire away. Depending on your camera model, you could take as many as ten frames per second!
Focal Length.
The focal length is how zoomed-in your images will look like.
Long Exposure.
Long exposures are some of my favorite types of images to take. To create a long exposure image, you need to use a long shutter speed. Usually, you take a picture for several minutes. For example, take a look at the image below of clouds rolling by in my backyard in Arkansas.

Metering.
Your camera has a sensor that gets exposed to light to create images. You control how much light your sensor receives by what metering option you choose.
Noise.
When you use high ISO numbers, you can and will have noise. In the old days, with a film, they called it grain. You don’t want it.
Raw or JPG.
These are two of the many file types out there. Using raw is best, in my opinion, because it gives you more options when edited your images.


Recent Posts
Twenty Years in the Wild: The Patience Behind Capturing the Swallow Migration.
The Colorado River near Castle Dome glowed with first light, the water turning from ink to molten copper as the desert woke. Out of the riparian thickets rose a living wave of thousands of Tree...
Hey there, fellow shadow chaser. If you’re reading this, you’ve probably stood in golden hour light, watched a bird, a car, or a lone tree melt into a perfect black shape against a blazing sky,...